Average Patio Cost

How Much Does a New Patio Cost per Square Foot? 

patio cost hamilton ontario, patio installer hamilton ontario, stone patios in hamilton ontario

Investing in an outdoor living space can dramatically enhance your home’s functionality, curb appeal, and resale value. Among the most popular hardscape upgrades, a patio offers a versatile area for dining, entertaining, and relaxation. But before you break ground, it’s crucial to understand the factors that influence patio cost per square foot, contributing to the total cost of your project. In this guide, we’ll walk through material choices, labor and site‐preparation expenses, additional considerations (like drainage and permits), and pro tips for managing your budget—so you can plan with confidence.

Understanding Patio Cost per Square Foot Matters

When shopping for a new patio, contractors often quote prices in terms of dollars per square foot. This metric helps you:

  • -Compare material and labor options side-by-side.
  • -Scale your budget as you adjust patio size.
  • -Set realistic expectations for design features and finishes.

Rather than a vague lump-sum estimate, thinking in per-square-foot terms empowers you to make informed decisions about materials, layout complexity and design complexity , and extras like lighting or seating walls, considering the many factors that influence the overall cost.


Introduction to Cost Calculation

When planning a paver patio project, understanding the various factors that affect the overall cost is essential. The cost of a paver patio typically ranges from $10 to $24 per square foot, depending on the materials, design complexity, and labor costs. To get an accurate estimate, consider the size of the patio, the type of paver material, and the complexity of the design. For instance, a DIY paver patio project can be more cost-effective, but it may require additional labor and materials. By breaking down the costs per square foot, you can better manage your budget and make informed decisions about your patio project.


Key Factors That Drive Patio Cost per Square Foot

1. Material Selection

Patio materials, including various stone types, vary widely in appearance, durability, and price. Here’s a snapshot of common options:

Concrete pavers tend to be the most budget-friendly, averaging roughly $10–$25 per square foot installed, representing the lower end of the pricing spectrum. Their uniform shapes and interlocking design make them relatively quick to lay and easy to replace if damaged. Natural stone options—such as flagstone, bluestone, or limestone—command higher prices ($20–$40 per square foot) due to their classification as premium materials. due to quarrying, irregular shapes, and more labor-intensive installation, making them high end materials. Exposed aggregate or stamped concrete can fall in the mid-range ($12–$30 per square foot), offering customizable textures and colors at a lower cost than natural stone.


2. Site Preparation and Excavation

Before any patio can be laid, the project site must be cleared of vegetation, debris, and, in some cases, existing structures, depending on the site conditions. Excavation depth depends on frost-line requirements in Ontario: typically 8–12 inches. Proper grading ensures drainage away from your home’s foundation and prevents puddling on the patio surface, among other factors that affect installation . This groundwork, which can add $3–$8 per square foot, is non-negotiable—skimping here risks shifting pavers, cracking concrete, or uneven settling over time.


3. Base Material and Installation

Once the site is excavated, a sturdy base of crushed stone or gravel must be installed and compacted. A typical base for paver patio installation consists of a 4–6 inch layer of ¾-inch crushed limestone or similar aggregate. You’ll also need a layer of bedding sand for pavers or a concrete slab for cast-in-place projects. Base-related costs generally range from $2–$5 per square foot, depending on material type, depth, and material availability.


4. Labor Costs and Complexity

Labor is often the single largest variable in patio pricing. Experienced installers charge anywhere from $8–$20 per square foot, depending on the following:

  • -Pattern complexity: Herringbone, basket weave, and intricate patterns take longer to install than simple running bonds.
  • -Site access: A backyard that’s hard to reach or has tight spaces may require additional labor to haul materials.
  • -Slope and grading: Terraced or multi-level patios involve retaining walls and more precise leveling.

5. Finishing Touches and Accessories

Your per-square-foot figure should account for extras that transform a basic hardscape into an inviting outdoor room, including the cost of removing or replacing other materials. These might include:

  • -Sealing and joint stabilization to protect pavers from stains and freeze-thaw damage.
  • -Border treatments such as contrasting stone, metal edging, or planter walls.
  • -Integrated lighting, which can add $10–$30 per linear foot but dramatically enhances usability after dark.

While accessory costs are often quoted separately, they can effectively raise your average cost per square foot by 10–20 percent when amortized over the entire patio area.


Outdoor Space Design

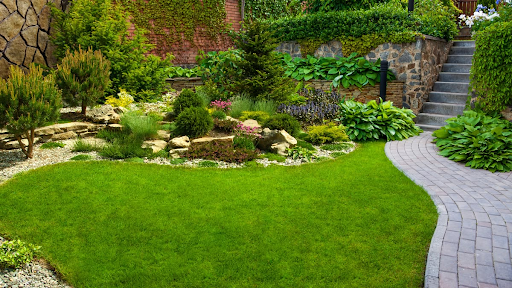
A well-designed outdoor space can significantly enhance the aesthetic appeal of a property. When designing an outdoor space, it’s essential to consider the patio size and layout, as well as the type of paver material and other features such as fire pits or outdoor kitchens. The right paver material can make a significant difference in the overall look and feel of the patio. For instance, concrete pavers are a popular choice for outdoor patios due to their durability and low maintenance. Natural stone, such as flagstone or brick pavers, can also add a touch of elegance to the patio. By carefully selecting the right materials and design elements, you can create an inviting and functional outdoor space.


Patio Installation Process

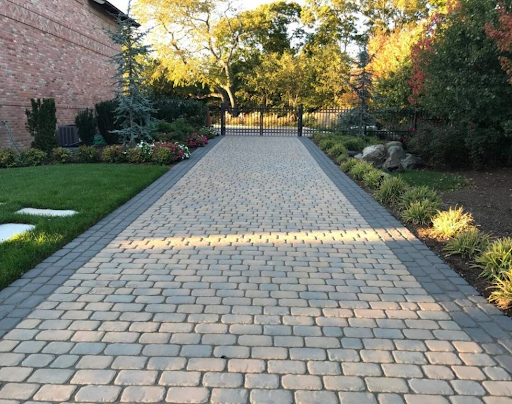
The patio installation process involves several steps, including site preparation, base preparation, and paver installation. Proper base preparation, often requiring professional installation, is a crucial step in ensuring the longevity of the patio. The base material should be well-compacted crushed stone, with a minimum depth of 7-9 inches. Compacting the base material in “lifts” (3-4 inches at a time) is essential to prevent shifting or sinking of the patio. Additionally, proper drainage is critical to prevent water damage and ensure the patio remains safe and functional. By following these steps, you can ensure a durable and long-lasting patio installation.


Real-World Cost Breakdown Examples

To illustrate how these factors combine, let’s examine a few examples of hypothetical patios:

  1. -Basic Concrete Paver Patio (300 sq ft)
  • Excavation & grading: $1,200 ($4/sq ft)
  • Gravel base & sand bedding: $900 ($3/sq ft)
  • Pavers & labor: $6,000 ($20/sq ft)
  • Sealing & edge restraints: $600 ($2/sq ft) Total: $8,700 → $29/sq ft

  1. -Flagstone Patio with Seating Wall (500 sq ft)
  • Excavation & grade prep: $2,500 ($5/sq ft)
  • Base materials: $2,000 ($4/sq ft)
  • Stone & intricate pattern labor: $17,500 ($35/sq ft)
  • Seating wall (40 ft @ $50/ft): $2,000
  • Lighting & sealant: $2,000 Total: $26,000 → $52/sq ft

These scenarios underscore how material choice and design features drive the per-square-foot cost. A simple paver patio may cost under $30 per square foot, whereas high-end natural stone installations can exceed $50 per square foot once all elements are factored in.


Additional Cost Considerations

Drainage Solutions

Improper drainage can jeopardize both your new patio and your home’s foundation. French drains, swales, or channel drains may be necessary if water doesn’t naturally flow away from the patio surface. Budget $5–$15 per square foot for professional drainage installation.


Permits and Local Regulations

Many municipalities in Ontario require permits for hardscape structures exceeding a certain footprint (often around 15 sq m). Permit fees are usually modest ($100–$500) but failing to obtain approval can result in costly fines or forced removal.


Seasonal Timing

While patios can be installed throughout much of the year, contractors are busiest from late spring through early fall. Scheduling off-peak may yield slight discounts, but cold-weather installations require special additives in concrete and can risk slower curing times.


Patio Size and Layout

The size and layout of the patio play a significant role in determining the overall cost. While larger patios require more materials and labor, a smaller patio can still provide essential space for outdoor living. A well-designed patio can include features such as a fire pit, outdoor kitchen, or hot tub, which can enhance the overall aesthetic appeal and functionality of the outdoor space. When designing a patio, it’s essential to consider the yard’s terrain, as well as the location of other outdoor features such as a pergola or short walkway. By carefully planning the size and layout, you can create a beautiful and functional outdoor area that meets your needs.


Tips to Manage Your Patio Budget

  1. -Optimize Patio Size: A larger patio offers more living space but increases costs linearly. Consider whether you’ll truly use every square foot. A well-designed 200 sq ft area can feel more spacious if it incorporates open sightlines, planters, or contrasting materials.
  2. -Mix and Match Materials: Combining budget-friendly pavers for the main area with a natural stone border can deliver visual impact without the premium price tag across the entire surface.
  3. -Prioritize Essentials First: Ensure the excavation, base, and drainage are done correctly before adding decorative elements. You can phase in lighting, seating, or built-in planters over time without jeopardizing the patio’s integrity.
  4. -Get Multiple Quotes: Don’t settle for the first estimate, as costs can vary based on several factors. Compare at least three qualified contractors, checking for consistent line items. A significantly low bid may cut corners; a sky-high bid could include unneeded extras.

DIY vs. Professional Installation

Enthusiastic homeowners sometimes consider tackling a diy paver patio installation themselves. While DIY can save labor costs, it also introduces risks:

  • -Time Investment: Excavating, grading, and compacting base materials is physically demanding and time-consuming.
  • -Precision Requirements: Even minor grading errors can lead to pooling or uneven settling.
  • -Warranty & Liability: Professional installers often provide warranties on labor and materials, and they carry insurance in case of onsite accidents.

Unless you have hardscape experience and the right equipment (plate compactor, masonry saw, etc.), hiring a reputable contractor typically ensures a high-quality, long-lasting result.


Benefits of Paver Patios

Paver patios offer several benefits, including low maintenance, durability, and aesthetic appeal. They can be designed to fit various budgets and can be made from a range of materials, including concrete pavers, natural stone, and brick pavers. Paver patios can also increase the value of a property and provide a comfortable outdoor space for relaxation and entertainment. With proper base preparation and drainage, a paver patio can last for many years, making it a cost-effective option for homeowners. Additionally, paver patios can be designed to include additional features such as polymeric sand, which can help prevent weed growth and improve drainage. By choosing a paver patio, you can enjoy a beautiful and functional outdoor space for years to come.


How to Choose the Right Patio Contractor

Look for companies that:

  • -Specialize in both material expertise and site engineering.
  • -Provide detailed, itemized bids showing per-square-foot breakdowns.
  • -Carry proof of insurance, licensing, and verifiable customer testimonials.
  • -Offer warranties on both materials and workmanship.

A skilled contractor will discuss your desired style, recommend suitable materials for Ontario’s freeze-thaw cycle, and explain how they’ll address site-specific challenges like soil conditions or slope, ensuring a well-executed patio design.


Return on Investment (ROI) Considerations

A professionally installed patio typically recoups 70–80 percent of its patio cost at resale, depending on market conditions and buyer preferences. In areas where outdoor living is highly valued, a well-designed patio can differentiate your property and command a premium, enhancing the appeal of your outdoor spaces. Even if you don’t plan to sell soon, enhanced enjoyment of your outdoor space and the ability to host friends and family often make the investment worthwhile.


Final Thoughts

Estimating the paver patio cost in dollars per square foot helps you balance design aspirations with budget realities. From basic concrete pavers at under $30 per square foot to bespoke natural stone terraces exceeding $50 per square foot, the choices are vast—and each comes with its own benefits, maintenance needs, and aesthetic impact, influenced by the patio's size. By understanding excavation, base preparation, labor, materials, and finishing touches, you can plan an outdoor space that meets your lifestyle without unexpected surprises.


When you’re ready to explore your patio options, get in touch with Wilson Hardscape for a free consultation and detailed cost estimate tailored to your property’s specific conditions and your design goals. We’ll help you create a durable, beautiful patio that stands the test of time—and the Ontario seasons.

landscape lighting hamilton ontario, safe lighting hamilton on, outdoor lights hamitlon on
July 3, 2025
Why Safe Lighting Matters Outdoor lighting serves two main purposes: aesthetic enhancement and safety. Landscape lighting not only dramatizes garden beds or water features but also significantly contributes to the overall beauty of outdoor spaces. While accent lights can dramatize garden beds or water features, safety lighting ensures that every step, turn, and edge is clearly visible. A well-lit pathway reduces trips; illuminated steps prevent missteps; perimeter lights deter intruders; and glare-free fixtures prevent harsh shadows that can disguise hazards. According to the National Safety Council, more than one million people are injured each year in falls on the same level, many occurring outdoors at night. By strategically placing lights at ground level, on posts, or on walls, you dramatically reduce these risks while adding value to your home. Introduction to Safety Lighting Outdoor lighting is a crucial aspect of home safety and security. It can illuminate dark areas around a property, making it more difficult for intruders to approach undetected. Safety lighting can also improve curb appeal and create a sense of warmth and welcome for visitors. In Canada, outdoor lighting is a great choice for homeowners who want to enhance their outdoor living space while also improving safety. With a wide range of styles and options available, it’s easy to find the perfect outdoor lighting solution to suit your needs and budget. Start with an Outdoor Lighting Plan Before ordering fixtures, sketch your outdoor space to scale. Note the locations of: -High-traffic areas : patio seating, dining zones, walkway entrances. -Changes in grade : steps, retaining walls, slopes. -Potential obstacles : garden edging, potted plants, water features. -Electrical access points : outdoor outlets, junction boxes. A simple plan helps you visualize fixture placement and explore different lighting techniques to achieve an inviting and aesthetically pleasing layout. Planning also allows you to customize your lighting setup to suit various preferences, such as adjusting beam angles or color temperatures. It also prevents over-illumination—too much light can create glare and deep shadows, defeating the purpose of safety lighting. Types of Fixtures for Safety and Ambiance While you want to minimize list items, it’s useful to identify the primary categories of outdoor lighting for safety: -Path Lights : Low-voltage posts (10–18 inches high) that cast a soft pool of light onto walkways. Path lights enhance safety and aesthetics for outdoor walkways, often featuring motion sensors that activate lights during the night. -Step and Stair Lights : Recessed into risers or mounted on walls, these eliminate dark steps. -Wall-Mounted and Sconce Lights : Affixed to house walls or fence posts to wash patios in ambient light and reduce shadowy corners. -Wall Lights : Solar-powered wall lights are wireless, waterproof, and equipped with motion sensors. They are ideal for enhancing security and illuminating outdoor spaces like yards, gardens, and garages. -Spotlights and Well Lights : Angled up from the ground to highlight trees or architectural elements without blinding the eye. -Garden Lights : These lights enhance landscaping and provide safety along pathways. Garden lights are versatile for illuminating various outdoor features, such as flower beds and decorative elements, and solar options offer energy-saving benefits. -Outdoor String Lights : These lights are essential for enhancing outdoor spaces like patios and backyards. Outdoor string lights contribute to creating ambiance and a welcoming environment for gatherings and leisure activities, often compatible with smart home devices and customizable to suit various occasions. Each fixture type serves a dual role—ensuring safety while contributing to overall ambiance. Choosing the Right Light Level Outdoor lighting is measured in lumens rather than watts. As a general guide: -Pathways : 5–10 lumens per square foot -Steps and Stairs : 10–15 lumens directly on each riser -Patio Dining Areas : 30–50 lumens per square foot -Accent Lighting : 15–25 lumens aimed at focal points Choosing the right white light and its versatility in adjustable color temperatures can significantly enhance your outdoor space. The ability to modify the color temperature allows you to set the right mood for any occasion. Avoid mixing fixture types haphazardly; instead, layer lights so they complement one another. For example, path lights guide footsteps while wall-mounted sconces provide an overhead wash that eliminates shadows. Different lighting levels can create the perfect mood, whether for festive gatherings or relaxing evenings. Spacing and Placement Guidelines Even light distribution is key for safety. Space path lights approximately 6–8 feet apart, adjusting for brightness and beam spread. Arrange lights to line pathways and steps, enhancing both visibility and aesthetic appeal. Place step lights 12–18 inches above each stair tread to ensure the entire step is illuminated. When using wall sconces, mount them about 6–8 feet above the ground so the light falls evenly across walking surfaces. Varying levels of lighting can add dimension to outdoor spaces, transforming their appearance and mood. Be mindful of glare—lights shining directly into eyes can temporarily blind guests. Angle fixtures toward the ground and use shields or louvers to control beam spread. Opt for warm-white LEDs (2,700–3,000 K) to create an inviting glow without harshness. Power Sources: Low-Voltage vs. Solar Two popular options power modern outdoor lights: Low-Voltage Wired Systems - These use a transformer to step down 120 V to 12 V, making installation safer and wiring more discrete. Trenching or conduit may be required, but performance is consistent even on cloudy nights. LEDs draw very little current, so a single transformer can run dozens of fixtures. Pricing for these systems can vary, so it's important to compare options to find the best value. Solar-Powered Fixtures - Ideal for temporary or remote installations, solar lights require no wiring. Look for models with high-efficiency photovoltaic panels and lithium-ion batteries for reliable runtime. Keep in mind that heavy shade or prolonged rain can reduce solar performance, so reserve these for well-lit areas or as supplementary lighting. Solar-powered fixtures are often sold in multipacks, providing a convenient option for covering larger areas. Controls and Automation Integrating timers, photocells, and motion sensors maximizes efficiency: -Timers let you program lights to turn on at dusk and off at a set hour, conserving energy. -Photocells detect ambient light, automatically activating fixtures at twilight and shutting them off at dawn. -Motion Sensors remain in low-level standby until movement triggers bright illumination—great for steps, entryways, and security. Using an app can enhance user experience by allowing remote control over lighting features, such as scheduling and automation. Combining photocells with motion sensors ensures a baseline wash of light with extra brightness when someone approaches. This setup offers easy control, simplifying the management of individual or grouped lighting features. Additionally, lighting can be controlled via smart devices, providing both convenience and enhanced security. Wiring and Installation Tips Safety lighting must comply with local electrical codes. Always use outdoor-rated cables (UF or direct-burial) and GFCI-protected circuits. Bury wires at least 6–8 inches deep, or use conduit where necessary. Label junction boxes clearly for future maintenance. You can purchase our lighting products through a network of showrooms, retailers, and dealers. If you’re not comfortable with electrical work, hiring a licensed electrician or experienced installer is worth the investment. Professional installation ensures your system is safe, reliable, and covered under warranty, with excellent support to help you confidently invest in landscape lighting for enhancing beauty, safety, and security around your home. Enhancing Safety with Smart Design Beyond technical placement, consider how people move through your space. Create clear sightlines from the house to key zones, and avoid planting tall shrubs that block light. Reflective materials—light-colored pavers, metallic finishes on fixtures—amplify illumination, making the most of each bulb. Proper lighting helps people navigate through spaces safely and efficiently. Also, think about transitions. Where grass meets stone, a low-profile bollard or recessed light prevents tripping and helps brighten the area, enhancing visibility. At garden edges, mulch or gravel “buffers” absorb stray light and mark boundaries. Flexible lighting designs can form various shapes, adding both practicality and aesthetic appeal. Attention to these details ensures that lighting feels intuitive, guiding visitors naturally along safe routes. Security Benefits Outdoor lighting can provide numerous security benefits for homeowners. By illuminating walkways, patios, and other areas around a property, outdoor lights can help to deter intruders and improve safety. Motion sensor lights, in particular, can be an effective way to startle potential intruders and alert homeowners to movement around their property. Additionally, outdoor lighting can help to reduce the risk of accidents and injuries by providing safe passage and illuminating potential hazards. With the right outdoor lighting system, homeowners can enjoy peace of mind and improved security. Energy Efficiency Solar lights are a great option for homeowners who want to reduce their energy consumption and save money. These lights are powered by the sun and require no electricity, making them a cost-effective and eco-friendly choice. Solar lights are also easy to install and require minimal maintenance, making them a great option for busy homeowners. By choosing energy-efficient outdoor lighting options like solar lights, homeowners can reduce their carbon footprint and contribute to a more sustainable future. Lighting for Specific Areas Different areas of a property require different types of outdoor lighting. For example, pathway lighting is essential for illuminating walkways and providing safe passage, while patio lights can help to create a warm and inviting atmosphere for outdoor entertaining. Deck lights, on the other hand, can help to illuminate stairs and railings, reducing the risk of accidents and injuries. By choosing the right type of outdoor lighting for each area of your property, you can create a safe and welcoming outdoor space that meets your needs and enhances your lifestyle. Maintenance for Long-Term Reliability Even the best-designed lighting system needs periodic upkeep. Twice a year, clean fixture lenses to remove dust, pollen, and insect debris that reduce output. Check for damaged cables or loose connections, and replace batteries in solar units as needed. Trim overgrown plants that cast new shadows or obstruct photovoltaic panels. Additionally, maintaining lighting accessories is crucial to ensure they continue to enhance the aesthetic and functional aspects of your outdoor space. Regular maintenance not only preserves safety but also prolongs the life of your investment. A small effort every season can limit larger, costlier repairs down the road. Design Inspiration and Final Touches Safety doesn’t mean utilitarian blandness. Combine safety lighting with decorative accents—string lights overhead, lanterns on side tables, and uplights that highlight specimen trees. Lighting can be adjusted for different occasions, ensuring the right mood for celebrations and casual gatherings alike. Subtle layering creates depth: a softly lit path leads to a glowing fire table, framed by shadow-dappled foliage. This interplay of light and dark transforms your patio, decks, and porches into welcoming night-time retreats. Additionally, effective lighting can enhance a balcony, turning it into a charming environment suitable for evening use and social gatherings. Bringing It All Together Planning landscape lighting for patio and pathway safety in your yard is a blend of technical know-how and creative vision. Start with a detailed site plan, choose appropriate fixtures, calculate lumen requirements, and decide on power sources. Employ controls for automation, follow proper wiring practices, and maintain fixtures regularly. By considering how people move, what they see, and how light interacts with surfaces, you’ll create a safe, beautiful outdoor environment. Different lighting options suit various needs, enhancing both functionality and aesthetic appeal around your home. For expert guidance on designing and installing a seamless outdoor lighting system that prioritizes safety, comfort, and style, contact Wilson Hardscape . Their experienced team will ensure your patio and pathways shine brightly—without blinding your guests—so you can enjoy evenings outdoors with confidence and peace of mind. Customers can compare different lighting products to find the best fit for their specific requirements.
Stone patios hamilton ontario, stone patios near me, stone patio installer, hardscape ontario
June 19, 2025
This is a subtitle for your new post
driveway paving hamilton ontario, best driveway pavers hamilton on, driveway paving hamilton on
June 10, 2025
Choosing the Best Pavers for Driveway Selecting the perfect pavers for your driveway is an investment in both function and curb appeal. In Ontario’s challenging climate—where freeze-thaw cycles, heavy rains and occasional heat waves all take their toll—your choice of driveway pavers can mean the difference between a surface that lasts decades and one that requires constant repairs. This 1,500-word guide will walk you through the most popular paver materials, performance considerations, aesthetic choices, installation essentials, and maintenance tips so you can confidently choose the right pavers for your driveway. Introduction to Driveway Pavers Driveway pavers are a popular choice for homeowners looking to enhance their home’s curb appeal and create a durable, low-maintenance driveway. Available in a variety of materials such as concrete pavers, brick pavers, and natural stone pavers, these options offer a wide range of styles, textures, and colors to suit any home’s exterior. Whether you’re replacing an existing driveway or installing a new one, driveway pavers provide a stylish and practical solution. Designed to withstand heavy loads and support heavy vehicles, they are built to last, making them a smart investment for any homeowner. With their ability to create unique and visually appealing driveways, pavers are an excellent choice for driveway landscaping. Why Paver Selection Matters Your driveway is more than just a path from the street to your garage. It’s a focal point that welcomes guests, protects your vehicles, and directly impacts your home’s resale value. The ideal paver not only complements your home’s architectural style but also withstands tire loads, resists moisture intrusion, and maintains its appearance year after year. Many homeowners focus solely on upfront costs, only to discover later that inexpensive pavers can crack under weight, fade in sunlight, or allow weeds to sprout through worn-out joints. By understanding the full lifecycle of your chosen material—including installation and maintenance—you ensure a driveway that looks great, functions reliably, and delivers a solid return on investment. Understanding the full lifecycle of your chosen material is crucial for ensuring a durable and aesthetically pleasing driveway. Common Driveway Paver Materials Concrete Pavers Concrete pavers are molded under high pressure and cured to achieve consistent shape and strength. They’re available in a spectrum of colors, textures and finishes, from smooth and modern to tumbled and rustic. Because they interlock, individual pavers can flex slightly under vehicle loads without cracking, and damaged units are easy to replace. Key benefits: -Wide range of colors and styles -Uniform sizing for quick installation -Cost-effective, typically $10–$25 per square foot installed Natural Stone Pavers Natural stones such as flagstone, bluestone, granite, and limestone bring an organic, high-end look to driveways. Each stone is unique in hue and veining, giving your driveway a one-of-a-kind character. Granite offers the greatest durability, while flagstone and limestone provide more texture but may require sealing to resist staining. Key benefits: -Timeless, premium appearance -Exceptional hardness (especially granite) -Long lifespan, often 50+ years Brick Pavers Clay brick pavers lend traditional warmth with their rich reds, tans and browns. Fired in kilns, they resist fading and are naturally water-resistant. While bricks may shift more than concrete pavers if the base isn’t perfectly uniform, they continue to be a favorite for heritage and craftsman-style homes. Cobblestone-inspired brick pavers can further enhance the traditional and rustic appeal of a driveway, combining the aesthetic charm of European streets with modern durability. Key benefits: -Classic, enduring aesthetic -Natural color retention -Slip resistance when textured Porcelain Pavers A modern newcomer, porcelain pavers are kiln-fired with low absorption rates and virtually no color fading. They mimic stone or concrete finishes and resist stains, scratches and freeze-thaw damage. Proper edge restraint and a compacted base are essential, as porcelain can be more brittle under heavy loads. Additionally, porcelain pavers resist damage even when exposed to harsh environmental conditions. Key benefits: -Ultra-low maintenance -Fade-proof, stain-proof surface -Sleek, contemporary look Performance Factors to Consider When evaluating paver options, consider these critical performance attributes for Ontario driveways: - Load-Bearing Capacity Your driveway must support passenger vehicles, trucks and seasonal equipment without cracking. Opt for pavers at least 60–80 mm thick, and ensure your installer compacts an 8–12 inch aggregate base to distribute weight evenly. - Freeze-Thaw Resistance Moisture trapped in pavers or joint sand can freeze, expand and cause surface spalling. Look for pavers rated for freeze-thaw climates (many concrete and brick manufacturers offer air-entrained mixes), or choose naturally dense materials like granite or porcelain. - Slip Resistance Driveways can become slippery when wet or icy. Textured surfaces—whether sand-blasted concrete, cleft natural stone or grooved brick—provide extra traction and improve safety during Ontario’s wet springs and frosty winters. Aesthetic & Design Choices Your driveway sets the tone for the entire property and enhances the beauty of your home. Keep these design tips in mind: - Color Coordination: Match or complement your home’s exterior palette. Cool-tone grays and charcoal suit modern façades, while warm reds and tans echo brick or wood accents. - Pattern Selection: Running bond is simple and economical, while herringbone (at 45° or 90°) locks pavers together tightly under traffic. Basket-weave or circular patterns add visual interest but require more cutting and labor. - Borders & Accents: A contrasting border paver can frame the driveway, lend definition and prevent edge shifting. Inlays—such as a stone medallion near the garage—create custom focal points. - Integration with Landscaping: Soften hard edges with planting strips, low walls or groundcover between paver sections. Permeable joints filled with stone mulch also support moss or creeping thyme for a cottage-style look. Benefits of Pavers Pavers offer numerous benefits that make them an attractive choice for driveways. Their durability ensures they can withstand heavy loads and resist cracking, providing better longevity compared to other materials like asphalt or poured concrete. Pavers are also easy to repair; if one becomes damaged, it can be replaced without disturbing the surrounding area. This modularity allows for creative designs and patterns, enhancing the aesthetic appeal of your driveway. Additionally, pavers come in a wide range of colors, shapes, and textures, allowing you to create a driveway that perfectly complements your home’s exterior. By choosing pavers, you not only improve your home’s curb appeal but also increase its overall value. Installation Essentials Even the finest pavers will underperform if installed improperly. A standard installation includes: -Excavation: Remove topsoil, vegetation and any existing pavement to the required depth—typically 8–12 inches below the finished grade. -Subgrade Preparation: Compact the native soil to provide a stable foundation. -Aggregate Base: Spread 4–6 inches of crushed stone or gravel, moisture-conditioned and compacted in layers. -Bedding Layer: Screed 1 inch of coarse sand or stone dust to achieve the exact pitch (1–2% slope away from the house). -Paver Laying: Install pavers starting from a straight edge, working outward and inserting edge restraints to secure the perimeter. -Compaction & Jointing: Pass a plate compactor with a neoprene mat over the surface, then sweep in polymeric or jointing sand and mist to lock pavers in place. -Sealing (Optional): Apply a breathable sealant to protect porous materials from staining and freeze-thaw damage. Pavers offer significant advantages over traditional concrete slabs, providing enhanced durability and aesthetic appeal, making them a superior choice for driveways and walkways. Most professional installations for a standard 300 sq ft driveway take about 5–7 days on-site, depending on pattern complexity and site accessibility. Paver Accessories and Sealers To maximize the performance and lifespan of your driveway paving , consider incorporating accessories and sealers. Edge restraints are essential for keeping pavers in place and preventing shifting over time. Joint sand, particularly polymeric sand, helps lock pavers together and inhibits weed growth. Applying a sealer to your pavers can protect them from stains, weathering, and freeze-thaw damage, ensuring they maintain their appearance and functionality for years to come. Sealers come in various finishes, from matte to glossy, allowing you to choose the look that best suits your driveway. By investing in these accessories, you enhance the durability and aesthetic appeal of your paver driveway. Budgeting & Cost Overview Your per-square-foot cost depends on material, pattern complexity and site conditions, with different materials being suitable for various budget ranges and aesthetic preferences: -Concrete Pavers: $10–$25 per sq ft installed -Brick Pavers : $15–$30 per sq ft installed -Natural Stone: $20–$50 per sq ft installed -Porcelain Pavers: $25–$45 per sq ft installed Remember to account for excavation, base materials, edge restraints and any necessary drainage solutions, which can add $5–$10 per sq ft. To manage costs: -Mix Materials: Use budget-friendly concrete pavers for the bulk, with natural stone accents near the garage or entry. -Phase Add-Ons: Install the main driveway first; add borders, inlays or lighting later. -Shop Multiple Quotes: Compare at least three itemized estimates, and verify that base preparation and permits are included. Maintenance for Longevity Proper upkeep ensures your driveway looks great and performs reliably, extending the life of your pavers: -Regular Cleaning: Sweep away grit and debris to prevent joint erosion. Annual pressure-washing refreshes colors and removes mildew. -Joint Replenishment: Over time, polymeric sand may wash out; sweep in fresh joint sand and mist to re-lock the pattern. -Sealing: For natural stone and some concrete pavers, reseal every two to three years to protect against stains and freeze-thaw damage. -Spot Repairs: Keep extra pavers from your original batch on hand. Lift and replace any cracked or heavily stained units without disturbing the surrounding area. Common Mistakes to Avoid When selecting and installing pavers for your driveway, avoiding common mistakes can save you time, money, and frustration. One major pitfall is skimping on base preparation; a poorly compacted base can lead to settling and cracking. Ensure your installer uses a sufficient depth of compacted aggregate to support heavy loads. Another mistake is choosing pavers based solely on price; cheaper options may not offer the durability or aesthetic appeal you desire. Additionally, neglecting proper drainage can result in water pooling and erosion. Finally, failing to maintain your pavers, such as not replenishing joint sand or sealing the surface, can reduce their lifespan and appearance. By being mindful of these potential issues, you can ensure a successful and long-lasting paver driveway installation. DIY vs. Professional Installation While small pathways can be a fulfilling DIY project, driveway installations involve heavy machinery, precise grading, and vehicle-load engineering. Professional installation can elevate the quality and appearance of your driveway. Professionals offer: -Guaranteed Compaction: Proper base prep prevents future settling and cracking. -Warranty Coverage: Labor and material warranties protect you if issues arise. -Efficient Scheduling: Skilled crews coordinate excavation, material deliveries, and permit inspections to keep your project on track. Making Your Final Decision Your driveway paver choice should align with your home's exterior, balancing aesthetics, performance, and budget. Concrete pavers deliver versatility and economy; brick offers timeless charm; natural stone provides unmatched character; porcelain brings low-maintenance modernity. Whichever material you select, prioritize a thoroughly engineered base, reliable drainage, and precise installation to withstand Ontario’s seasons. Ready to transform your driveway? For expert guidance on paver selection, design, and installation tailored to your home’s style and climate conditions, contact Wilson Hardscape . Our experienced team will help you create a durable, beautiful driveway that enhances your property’s curb appeal and stands the test of time.